About accessible digital content
Accessible digital content is created and/or presented in a way that people with disabilities “can equally perceive, understand, navigate, and interact with websites and tools… [as well as] contribute equally without barriers” (Web Accessibility Initiative Education and Outreach Working Group, 2016).
Because people and their abilities (and disabilities) are varied, it’s not possible to simply define course content as “accessible” or “inaccessible”. Rather, content accessibility is a continuum and so the process for creating more accessible course content is iterative, dynamic and always something that can be improved.
This page provides information about where to get support, six practices that will help you create more accessible content, built-in accessibility checkers for commonly-used tools, and additional resource and reference materials.
Where to get help with your content
LTSI’s Learning Experience Designers and the Centre for Accessible Learning (CAL) are available to provide guidance and support to educators who want to create more accessible content.
LEDs provide guidance and support to educators in designing accessible learning activities, creating / setting up accessible content and learning environments, and addressing the needs of learners with exam accommodations. You can connect with an LED through ltsisupport@uvic.ca.
The Centre for Accessible Learning works with educators and learners to promote educational equity and accessibility for learners registered with disabilities, and support learners in achieving academic goals. Please seek support from the CAL if you have questions about specific accommodations or alternate format requirements.
Six practices for creating more accessible content
These six practices will help you create more accessible content for your learners. These practices can be applied in your everyday workflows to email, presentation slides, documents, videos, Brightspace sites, and more.
1. Use clear and inclusive language
Consider how you can create content that is easy to follow and be understood by diverse learners. Clear language helps all learners, including those who may be learning another language, have a cognitive disability, have a learning disability, etc.
Some tips to help keep content clear and inclusive:
-
- use plain language and write for your audience
- use active verbs and personal pronouns
- explain unknown abbreviations and acronyms the first time they are used
- consider using list structures, white space and headers if appropriate
- avoid ‘figures-of-speech’ and metaphors that may be unfamiliar
- avoid jargon or consider providing a glossary
Check out WebAIM’s how-to article on writing clearly and simply for more information and examples.
2. Organize and format content for easier navigation
Content that is organized and formatted conveys meaning and a clear structure for learners. A clear structure helps learners navigate their environment by providing visual landmarks (for sighted learners) and encoded landmarks (for learners using assistive technologies).
Some tips to help organize and format content:
-
- use headings to group sections or sub-sections of related content to create a hierarchical structure (e.g. title (H1), main sections (H2), sub-sections (H3), etc.)
- use list formatting wherever a logical list is present (bullets for unordered items, numbers for ordered items)
- use tables for data and ensure that row and header columns are properly coded
- avoid using tables to control page layout and avoid splitting or merging cells in tables
- use sans serif font styles and sizes that are easy to read and can be resized / magnified without losing resolution (e.g. Arial, Calibri)
Check out WebAIM’s articles on headings and lists and creating accessible tables for more information and examples.
3. Check colour contrast and avoid using colour alone to convey meaning
Colour contrast and the use of colour play important roles in accessibility.
Colour contrast refers to the contrast between two adjacent colours and often refers to the contrast between body text and background, header text and background, or the visual elements on images (e.g. charts and graphs).
Low colour contrast creates barriers for some learners, including those with low vision, poor contrast vision or colour blindness, or those using a device that doesn’t display (or print) colour correctly or a device used with a monochrome setting.
The built-in accessibility checker in Brightspace looks for a contrast of at least 4.5:1 for normal text and 3:1 for large text (18 pt or larger, 14 pt or larger if bolded).
When it comes to using colour to convey meaning, some learners find colour helpful for distinguishing content. So you can absolutely continue to use colours. The important practice for improving accessibility is that you also provide indicators or descriptors to convey the meaning of colours for learners who are not able to perceive the colours used in your content.
The BCcampus Accessibility Toolkit: Colour Contrast resource has more information and tips on the use of colour and how to test the colour-contrast ratios of your content.
4. Write hyperlinked text that is descriptive and concise
Learners typically activate / interact with a link by clicking on it with their mouse, using their keyboard, or using assistive technology that registers a different type of input (e.g. voice command, eye movement).
Descriptive link text helps all learners including those who are low vision/blind, deaf or hard of hearing, or who have a physical disability or cognitive disability.
Some tips for writing accessible linked text:
-
- describe the function of the link (where it will take the learner)
- be concise, use a few keywords instead of a full sentence
- avoid descriptions like “click here” or “read more” (meaning is lost outside of context)
- avoid two or more different links that share the same text (will confuse learners)
- provide visual cues for sighted learners that linked text is present (e.g. default in Word and PowerPoint is blue underlined text, default in OAC is blue bolded text)
- if your document may be printed and you need to display the full URL / web address, first create a hyperlink that can be read or heard, and then include the URL as plain text (not linked)
The BCcampus Accessibility Toolkit: Links page has additional information and examples, and check out Microsoft’s short accessible links how-to video for Word.
5. Provide alternative (alt) text for images
Alternative (alt) text is one of the most important considerations for accessibility when including images in your course content.
Images without alt text (or with insufficiently descriptive alt text) present barriers for some learners including those who are blind or have low vision, are colour blind, have a cognitive disability, or those experiencing technical difficulties with slow internet (e.g. cannot load image) or device settings (e.g. screen colour).
An image is any non-text element that you include as content in your course. This could include a picture, diagram, chart, graph, map, and illustration. Common file types are: GIF, JPG, PNG.
Some tips for writing effective alternative text:
-
- use a short phrase that describes the image so that a learner who cannot see the image can still perceive and understand the information that is presented
- use a short phrase that conveys the content, context and functionality of the image, i.e., not just what the image looks like
- leave out “image of” or “graphic of” in the description because screen readers will add this part automatically
- if the image is decorative and not important you can choose to indicate it as decorative
- if it is difficult to create alt text for a complex image (e.g. graph, schematic, metabolic pathway), you may need to create an alternative version of the content that is accessible to students
The built-in accessibility checkers in Brightspace and other tools (e.g. Microsoft applications) will help you identify images that are missing alt text. They do not, however, help you generate quality alt text descriptions.
The BCcampus Accessibility Toolkit: Images resource has more details, tips and examples.
The Brightspace Community blog post “When simple alt text is insufficient” (login required) has suggestions and examples for how to provide alternative information for complex images.
WebAim.org provides an in depth review, including examples of the function and use of alternative text, as a textual substitute for non-text content.
6. Add captions to audio and video content
Captions and transcripts for audio and video content improve accessibility for a diverse range of learners. This includes learners who may be deaf or hard of hearing, be blind or have low vision, have a cognitive disability, are learning English as an additional language, or who are in a location where they cannot hear or play audio (e.g. on a bus or in a library).
Many learners report captions as being important to their learning and understanding of video content.
In live sessions, whether you’re in an online Zoom or MS Teams session or in a classroom and recording your lecture, we recommend turning on the live transcription / live caption functionality that is available in all of UVic’s video tools.
For recorded content (e.g. voiceover Powerpoint, Zoom recording), we recommend uploading the file (MP3, MP4, PPT) into UVic’s video platform, Echo360, so that your content is optimized for streaming and has transcripts automatically generated, which can be pushed to the caption track if they are accurate enough.
Tip: You can choose to edit your transcript before applying it to the caption track.
While automatic captions are approximately 70-90% accurate, this technology continues to improve. For learners who are registered with the Centre for Accessible Learning (CAL) with an accommodation that requires accurate captions, additional transcription supports are available.
The BCcampus Accessibility Toolkit: Multimedia web resource has additional details and tips.
Brightspace accessibility features
Brightspace conforms with the international Web Content Accessibility Guidelines (WCAG) 2.1 Level AA standards; however, it can be easy to inadvertently create or upload course activities and content that are not accessible.
Here are some tips for creating more accessible Brightspace content:
Use the built-in accessibility checker
The HTML page editor in Brightspace has a built-in accessibility checker. It works just like a spell checker to catch some of the most common accessibility issues. It will also give you tips on how to fix them!
![]()
The built-in accessibility checker reviews your added content and looks for the following items:
- Use of paragraphs as headings
- Sequential headings
- Adjacent links
- Ordered list structure
- Unordered list structure
- Contrast ratio of text to background colours
- Image ALT text
- ALT text filename
- Table Caption
- Complex table summary
- Table caption and summary
- Table heading scope, markup, and headers
Use HTML page templates
While you can upload content to Brightspace in other formats (e.g. Word, PowerPoint, PDF), Brightspace cannot check for whether these documents are accessible. If uploading content created in a different application, we recommend using the built-in accessibility checkers in those tools first and working through the six accessibility skills noted above.
Wherever possible, we recommend creating content directly in Brightspace, in the form of pages (web pages). It is easier for assistive technologies (e.g. screen reader) to interpret HTML code than application-based files such as Microsoft Word.
Brightspace has a number of accessible HTML page templates built right into your course. They are a great way to design your pages in a visually appealing and accessible manner!
To create a page (file) using an accessible webpage template in your course:
- Log in to https://bright.uvic.ca/ using your Netlink ID and password.
- Select the course you would like to add content to.
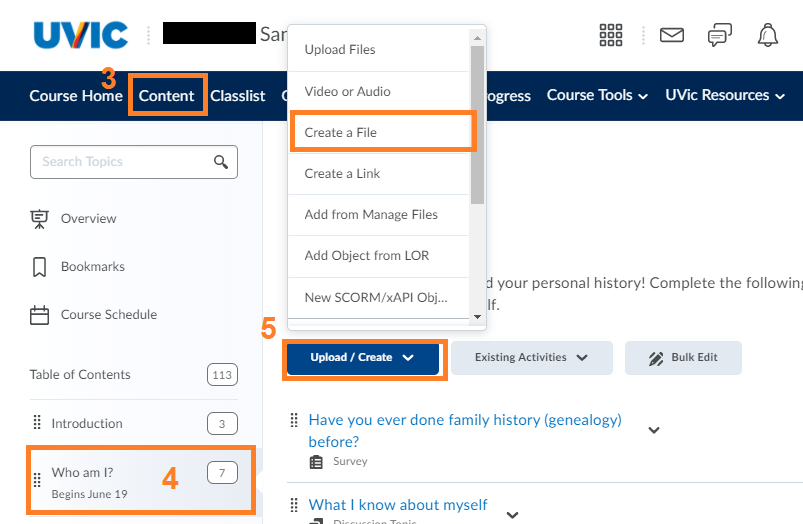
- Select Content in the top left of the blue navigation bar.
- On the left-hand column, click on the module you want to add a webpage to.
- Click the blue Upload/Create button at the top of the module, then select Create a File.
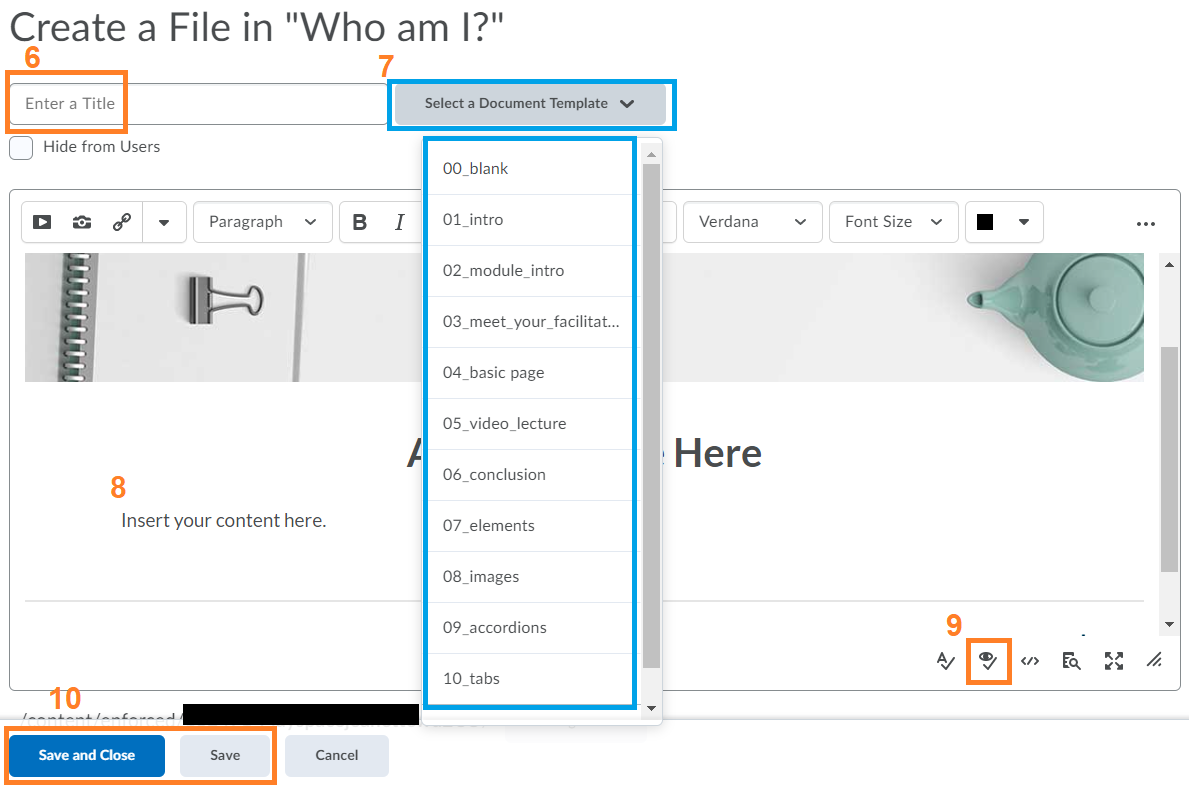
- Enter a title for your new webpage.
- Select an accessible webpage document template from the grey dropdown menu. Please note that using a pre-designed webpage template on any specific webpage will erase any existing page content. To prevent unintended loss of content, you may want to copy and paste your content from a pre-existing file directly into the webpage.
- Populate the template with your content. You can remove all prior text formatting by using Ctrl+Shift+V (Cmd+Shift+V on Mac). Click “Save” regularly at the bottom of the page if you are planning on working with the content for any extended period of time.
- Once you have finished, run the built-in accessibility checker again after building out your content in the webpage template to check for any additional accessibility issues that may have cropped up during the design process.
- Click the blue “Save and Close” button at the bottom of the page.
Optimize personal settings
All users in Brightspace can optimize their personal account settings according to their own accessibility needs and/or use of assistive technologies. These settings can be found by clicking on your name in the top right corner, then selecting “Account Settings”. You can then adjust the font size, dialog, and other settings. Click the blue “Save and Close” button at the bottom to save any changes.
Explore options for Math within Brightspace
While there are a variety of options for adding math within the Brightspace, D2L notes the following:
MathML is a standard adopted by the World Wide Web Consortium (W3C). It uses XML to describe mathematical notation by capturing both its structure and content. This enables MathML to support the visual display and assistive technology access. Its appearance is similar in structure to HTML. Unlike HTML, MathML is not designed to be hand-written. It is recommended that you compose equations in a visual editor and paste its MathML output into the Brightspace Equation Editor.
For more information, see Adding Math in D2L in the Equation Editor.
Customize learner special access to assignments and quizzes
You can use the Special Access feature in the Quiz Tool and Assignment Tool to author customized and flexible access for learners so that they can complete their activities and assessments with different availability dates or due dates (e.g. a make-up exam), or extra time (e.g. accommodation or internet disruption).
If you are supporting learners who are registered with the Centre for Accessible Learning (CAL) and who have specific academic accommodations, LTSI and CAL are available to assist with setting up accommodations.
Do not use Brightspace “Group” features when setting up special access for students with academic accommodations. Group names and membership are viewable by all students in the class (not private).
Additional tools, web resources and webinars
Brightspace (D2L) accessibility
D2L resources and tips in the Brightspace Community website (login required).
-
- Developing accessible content (web resource)
- Providing alternative learning materials (web resource)
- An Introduction to Digital Accessibility (web resoure)
- Reimagining Accessibility Online: Designing for Equity First (webinar)
- How to Help Make Learning Accessible with Brightspace (webinar)
- Five things educators need to know about web accessibility for online learning (Let’s Talk About Teaching 2020: webinar)
- D2L Accessibility Lab: Want to learn more about assistive technologies that some learners may be using? This website provides video demonstrations that help you understand how assistive technologies work, and the barriers they may encounter in an online learning environment.
Document accessibility
In Brightspace, we recommend creating pages and using the built-in accessibility checker to assist you, instead of uploading documents. If uploading a document, we recommend Word and PowerPoint instead of PDF.
-
- Create accessible Word files (Microsoft)
- Create accessible PowerPoint files (Microsoft)
- Create accessible Excel files (Microsoft)
- Create accessible PDFs – Office Support (Microsoft)
- Converting documents to accessible PDF’s (WebAIM)
Accessibility checkers can assist you in learning how to create accessible course content and they support the six core practices discussed above. There are some issues that accessibility checkers cannot detect and that’s why it’s important to review your work manually as well.
Presentation accessibility
Consider that some of your learners may not be able to see well or at all, hear well or at all, move well or at all, speak well or at all, or understanding information presented in some ways or at all.
These resources will help you plan and deliver sessions that help ensure your diverse learners are able to perceive and understand information that is in your slides, in the chat, being spoken aloud, or written on a surface (e.g. whiteboard in Zoom, a classroom flip chart or board).
- UVic PowerPoint templates
- How to make your presentations accessible to all (W3C WAI)
- Accessibility checklist for face-to-face presentations (uWaterloo)
References
- Dahl, B. (2017). Brightspace accessibility checker. Retrieved from https://community.brightspace.com/s/article/Brightspace-Accessibility-Checker
- Desjourdy, R. (2020). Building an accessible course in myCourses. Retrieved from https://www.mcgill.ca/equity/article/building-accessible-course-mycourses
- W3C Web Accessibility Initiative [Website]. (2010, March). Retrieved from https://www.w3.org/WAI/fundamentals/accessibility-usability-inclusion/