Video transcripts and captions provide a way to create more universally accessible learning experiences. This article explains two types of transcription and caption services available at UVic: transcription services for academic accommodation, and automatic transcriptions or captions produced by learning technologies.
Transcription services for academic accommodation
The Centre for Accessible Learning (CAL) contracts with TypeWell Transcribers to provide transcription services for Deaf or Hard of Hearing students. This provides transcription of at least 99% accuracy. Students who require accommodations related to audio content can talk to their CAL advisor to request interpreters and/or transcribers. For more information, please contact CAL.
Automatic transcription and captions
During live sessions, Zoom has machine-generated transcription and caption capabilities, and Teams has machine-generated caption capabilities. Echo360 videos (e.g. recordings, uploaded content) are automatically transcribed; however, captions need to be manually published, during transcript editing, before they will appear.
Although automatic transcription is imperfect and prone to error (70-90% accurate), it can help make video more accessible and engaging in a few ways:
- Allows students to read along with spoken content
- Allow students to listen from sound-sensitive or very loud environments
- Can support the learning for students who speak English as an additional language or have learning disabilities, as well as support students to more effectively digest complex information overall.
- Make it easier to locate specific concepts for review within a video
Editing transcription and captions
Faculty/instructors are not required to review or edit all transcripts and captions and are asked to include the following statement in their course site and/or syllabus and to make students aware of the likelihood of automated transcription and captioning error. For support with transcripts and captions, please contact ltsisupport@uvic.ca
Transcription & Captioning Statement:
Auto-generated transcription and captioning is enabled in this course. Please be aware that automated transcription and captioning is at best 70-90% accurate and by nature will include error. This depends on the subject matter, speaker, audio quality etc. Words prone to error include specialized terminology and proper names. Students are asked to refer to the audio feed for clarification of any errors. If you find transcription or captioning that is offensive, please contact your instructor and/or teaching assistant so that they are aware. If you require captions as part of an academic accommodation, please contact CAL.
The following tabs provide information on how to add, edit, and remove captions in various online tools.
Echo360 Automatic Transcription
Video transcripts are automatically generated for students when you upload or create a video in Echo in Brightspace. Transcripts are searchable and interactive for students. Whenever transcripts are of sufficient quality you can publish them as closed captions. Instructors and teaching assistants can edit transcripts for course published media – and you can also provide this ability to students (See Transcriptions and captions in Echo360 for more info)
Live Transcription in Zoom
Zoom provides live transcription in meeting sessions and we recommend enabling live transcription as the start of every Zoom session. To use this in your class session, follow these steps below. Captions are not retained in recordings, however, you can (optionally) turn on a setting that enables saving of the transcript. Please note that the live transcript feature does not function in breakout rooms.
Thanks to a June 21, 2021 update participants and co-hosts can now request through pop-up message (by name or anonymously) to have the host enable the live transcription feature.
- Start the meeting
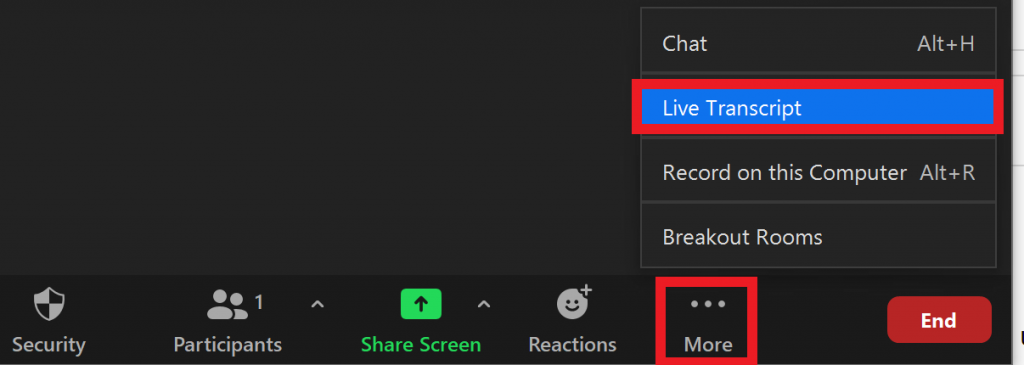
- Click the Live Transcription button in your meeting tool bar. You may have to click the More button first.


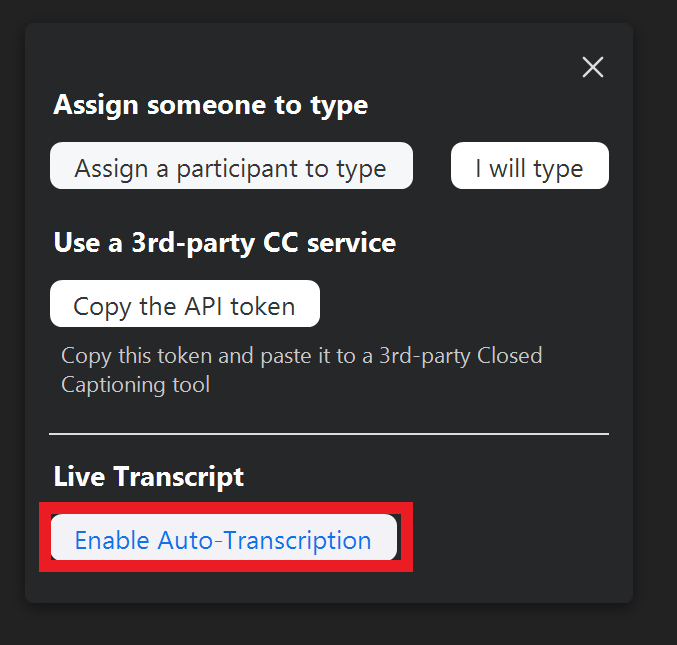
- Choose Enable Auto-Transcription

- The captions (subtitles) will display at the bottom of the screen as participants speak. Participants can customize the location of the subtitle bar, show/hide the bar, change font size, and even turn on a running transcript.

How to Enable the Save Captions (Save Transcript) Feature
To enable the host, and co-hosts and participants to save the transcript file from a session, navigate to the Zoom web app.
From uvic.zoom.us, the steps are:
- Log into your UVic Zoom account
- Click on Settings at the left side menu
- Search for Save Captions.
- Toggle Save Caption to the “on” position – the icon will shift to the right and appear blue.

Live Transcription in Teams
If you are using Teams (e.g. for class meetings or sessions), Teams can detect what’s said in a meeting and present real-time captions automatically. Meeting hosts (organisers) and participants control their captions separately. For more information, see the Live Captioning in Teams
Alternative: Assign to type closed captions in Zoom
To enable closed captioning in a live Zoom session, as the meeting host:
- Log into your UVic Zoom Account (https://uvic.zoom.us). You must login to the Zoom web portal, not the app to access this feature.
- Click Settings in the left-hand navigation menu.
- Scroll down the page until you reach the Closed captioning. Check that this option is enabled and toggled to the on position (blue with circle at the right side).
- (Optional) If you want participants to be able to save closed captions or transcriptions from your sessions, enable the Save Captions option.

To invite a participant and assign them the role of typing closed captions (transcribing):
- As the meeting host, invite a transcriber to your session by sharing the Zoom session URL.
- Once the transcriber arrives, click Participants to bring up the Participants list.
- Hover your cursor over the name of the transcriber participant, at which point a More > button will appear to the right of the transcribers name.
- Click More > and in the pop-up menu option that appears, choose Assign to type Closed Caption.

- At the end of your session, click Saved closed caption history in the caption window. Your .txt document will save in Documents > Zoom on your computer.
To take on the role of transcriber to type closed captions during a Zoom session:
- Join the Zoom session using the URL provided to you by the meeting host.
- As the transcriber, once the meeting host assigns you the ability to type closed captions, you’ll see the Closed Caption icon appear in your meeting controls along with the notification that the host has assigned you to type Closed Caption.

- Click the Closed Caption icon to bring up the closed caption window.
- Type in the closed caption window and press the Enter key each time you want to broadcast what you typed to participants.

How do students see Closed Caption? Once an instructor assigns a transcriber, students will receive a notification. To show closed captions, students need to click Closed Caption ![]() .
.
Tips for best results
- Set expectations with students. Explain that automatic captions are available to them if they wish to use them. However, automatic captions are limited in their accuracy so cannot be used as the primary way to access content
- Use a headset microphone to improve accuracy and control pace.
- Try to avoid or eliminate background noise that may interfere with your voice.
- When talking, describe what is happening in any visual information or content you present
- For live sessions, make sure your internet connection is reliable throughout your presentation. Slow internet speed or connectivity issues can interfere with the accuracy of the generated captions
- If you plan to re-use video content term after term, consider creating accurate captions as time permits.
- If students require captions for an academic accommodation, do not use automatic captions. Students can speak to their CAL advisor to request a transcriber

