About this guide
These instructions are supplied for using Crowdmark, which is an online, collaborative grading and analytics tool for instructors and TAs. In this guide, you will be taken through how to access and set up your course in Crowdmark, create assessments, grade assignments, and provide feedback.
Note: This guide is only for online, assigned assessments. Please visit Administered assessments for more information on in-person assessments.
Crowdmark is useful in cases in which handwritten work is important and students need to give full written answers or solutions and draw mathematical and graphical notation or other figures. Crowdmark offers a paperless way to distribute, collect, grade and provide feedback, all online.
If you would like more detailed task specific instructions or support, please refer to the Crowdmark Software website.
Get Started with Crowdmark
How to access Crowdmark
Crowdmark is integrated into Brightspace. You will find it under Course Tools > Crowdmark. To log into the service, search for the University of Victoria in the “Sign in through your school” option in the Crowdmark overview here.
Import your course into Crowdmark
To get started, you need to import your course into Crowdmark. You start the process from Brightspace by following these steps:
Step 1: Select Crowdmark from Brightspace
From your course main page, select Course Tools from the Navbar and select Crowdmark.

Step 2: Sign in to Crowdmark via Brightspace
You will be taken to Crowdmark‘s sign in page. Click on Sign in with Brightspace. Your sign-in information is your netlink ID and password.

Step 3: Import a Course
After logging in, you will be taken to your Crowdmark Courses page. To import, select Import a Course.

Choose your course from the dropdown menu. Click Import Course.

Step 4: Enroll your students
After your course is imported, you will see the course page. This is where you can enroll your students from Brightspace, add your team members, and make your assessments.
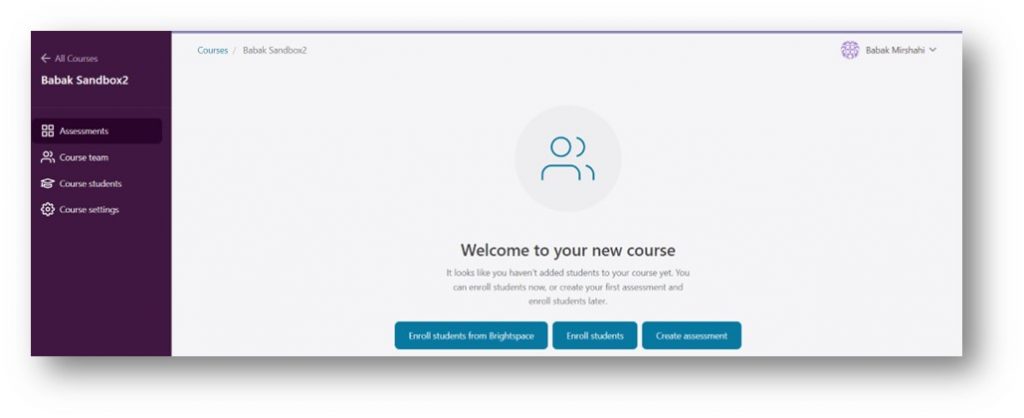
Enroll students
Once you import your Brightspace course into Crowdmark, you are encouraged to “Enroll” your students via syncing with Brightspace. Under the “Course students” tab, you can sync the roster with Brightspace at any time to update the list.
When creating an assessment in Crowdmark, you can assign all or just a few of course students into the assessment.
Note: LMS Groups and sections do not sync with Crowdmark, but they can be recreated manually in Crowdmark or by uploading a .csv file.
How will my students access their Crowdmark assignments
Follow these instructions to learn how students access Crowdmark assignments:
Step 1: When you post a new assessment, students will get an email notification letting them know there is a new assessment.

From there students will click on the ”Go to assignment” button, which will take them directly to your Crowdmark assessment.
Step 2: Students will select “Start the Assessment now”.

After starting the exam, if the assessment is timed, there will be a clock at the bottom right indicating how much time is left until submission.
Step 3: Students will answer the questions and/or upload their work.

*Note that Crowdmark only accepts some file format types. See below for a list of the supported file formats.

Step 4: Lastly, students will select “Submit for evaluation”.
Note that students have the option to edit and resubmit their work before the due date.

Create Assessments
Assessment types in Crowdmark
Crowdmark has two main types of assessments, Assigned and Administered.
The instructions below are only for Assigned assessments – assignments that are posted online and allow students to submit their work electronically by uploading images or other files containing their work. This assessment type is primarily for online courses and remote assessments.
Please visit Administered assessments for more information on In-Person exams and quizzes.
Set up the Assessment
To create a Crowdmark assessment you can follow the steps below:
Step 1: Sign in with Brightspace, select Crowdmark and click on your course
After signing in with Brightspace, go to your course page.
In the Course Tools drop-down menu in the navigation bar, select Crowdmark.

On the main Crowdmark page, click on your course.

Step 2: Create assessment
Click on the “Assessments” sidebar, then on the create assessment button.


Follow the below steps to setup the exam title, type (online or in-person), and options (Individual or Group submission).
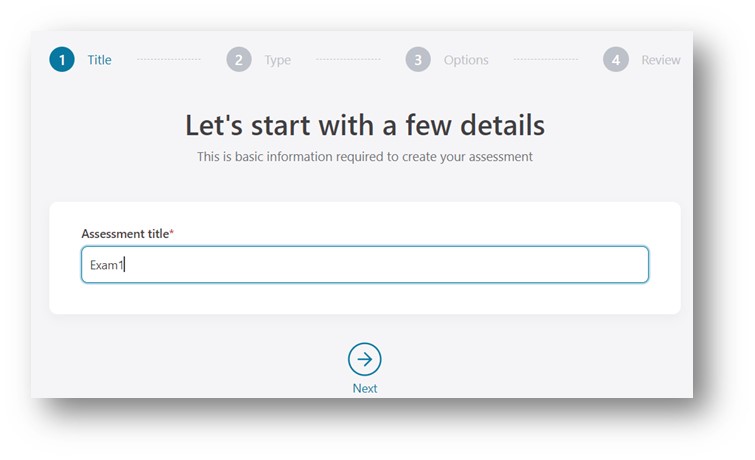
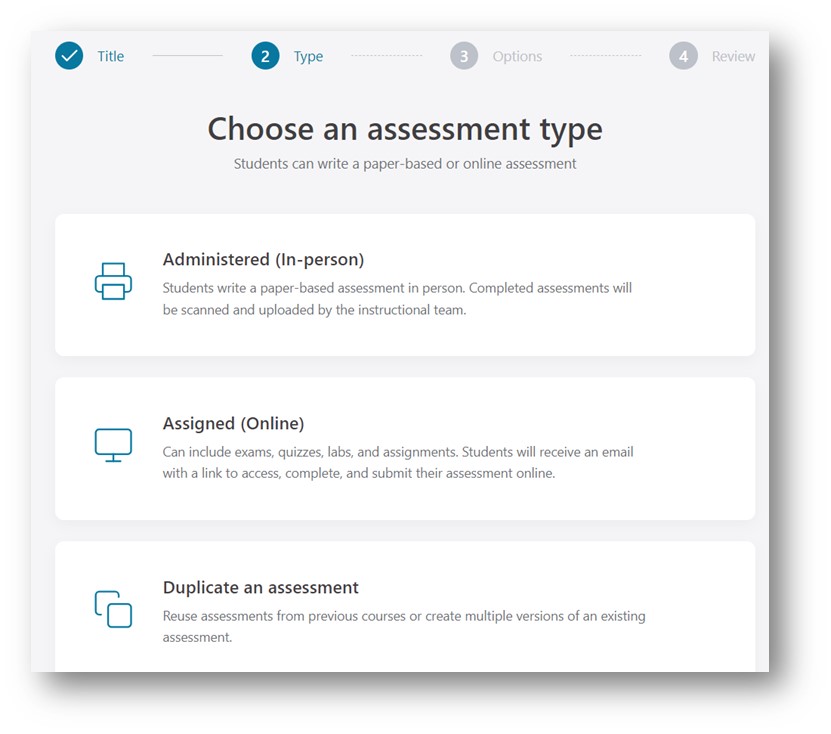

*For more details, please visit “Creating a group assignment“.
Setup the exam Questions, Schedule, and the Roster.
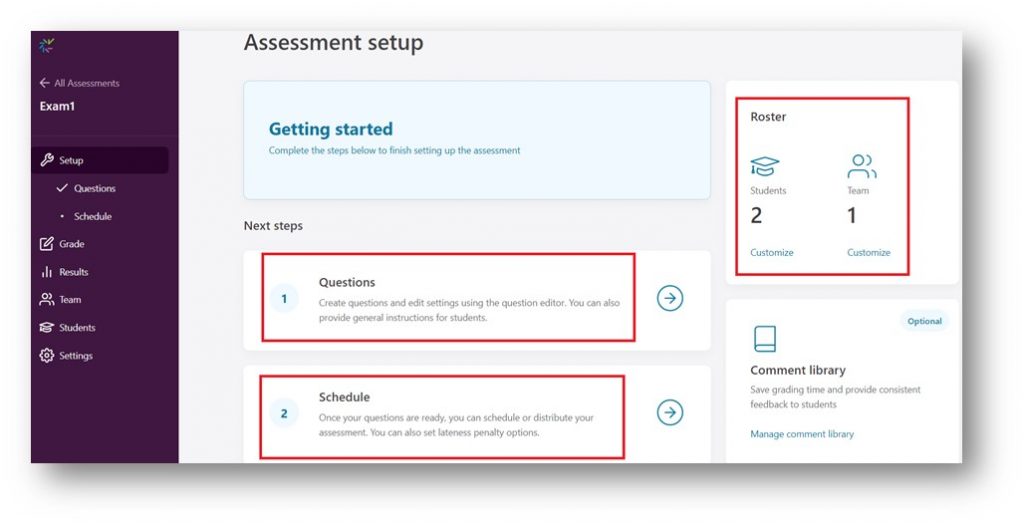
A. Add Questions: Please visit Adding Questions and see “Adding questions to an assignment“ for more details.
B. Schedule your exam: To set up the exam distribution time, time limit or lateness penalty please visit Distributing assignments online and see “Scheduling and distributing Assigned assessments“.
C. Roster setup: You can customize from your entire class who can take this exam or help as your team member (e.g., grader).
- Under Students, you can choose to make the assessment available to all enrolled students or you can choose to exclude some students (who might write the assessment later for instance).
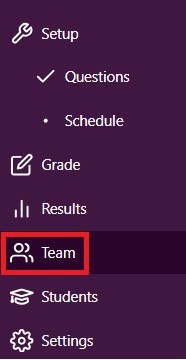
- Under Team, select the team members you want to be part of the assignment (Graders). The instructor is included by default.
For more details please visit Creating a group assignment.
Add questions
In “Assigned (online)” exams, the question types available in Crowdmark are Image/PDF file, Text (with Markdown formatting), and Multiple choice.
Here, you need to add a label (e.g., Q1), decide on your question type, add your questions, determine the score of each question, and decide whether it is a bonus question or not. You can also attach a file to each question. As for the Image/PDF and Text questions, you can create randomized question groups (different versions) for each question.
At the end or during the question addition, you may “Preview” your questions if you wish. To learn more about each question type and how to add them to an assignment, please visit adding questions to an assignment.
How to import premade questions from a Word or PDF document
You can copy and paste text from a Word or a PDF document into Crowdmark. You can also attach a file (e.g., PDF, word, image) to the question. See adding questions to an assignment for more information.
How to create Multiple Choice Questions (MCQs)
For more information on supported question types and how to add them in the “Assigned (online)” exams, please visit “How do I add questions to Crowdmark“.
For “Administered (in-person)” exams, Crowdmark uses bubble sheets and can automatically grade up to 200 multiple-choice questions. It supports multiple answers to a question. For more details, please visit “Using multiple choice questions in an Administered assessment”.
Note: Crowdmark does not have a dedicated question bank.
Distribute assignments online
Instructors can distribute the exam/assignment to all or selected students immediately, or at a scheduled time. Synchronous and asynchronous timings are available. You are not able to schedule an assessment until students are added to the assessment roster. For more details, see “Scheduling and distributing Assigned assessments”.
How to distribute assignments online


Duplicate, delete and lock an existing assessment
How to duplicate, delete and lock an existing assessment
- Go to your Crowdmark Course.
- Over the interested Assessment click on the ellipsis (3 vertical dots):
- Duplicate: You can copy the same assessment to the current or another course.
- Lock assessment: This makes the assessment “read-only”.
- Delete: To delete an assessment, you need to re-confirm by typing the file name.

Grade Assignments and Provide Feedback
How to grade assignments and leave feedback
You can see a student’s work right after it is submitted. However, you cannot mark submission until the due date/time or the end of the time limit arrives. Follow the instructions below to learn how to grade assignments and leave feedback:
Step 1: Go to Assessment
Upon being invited to grade an assessment in Crowdmark, you will receive an email. Select the Go to assessment button to be directed to the assessment.

Step 2: Click on your course and assessment to grade
On the main page, click on the course.

Click on the assessment to be graded.

Click on the Grade tab and then on the question to start grading it.
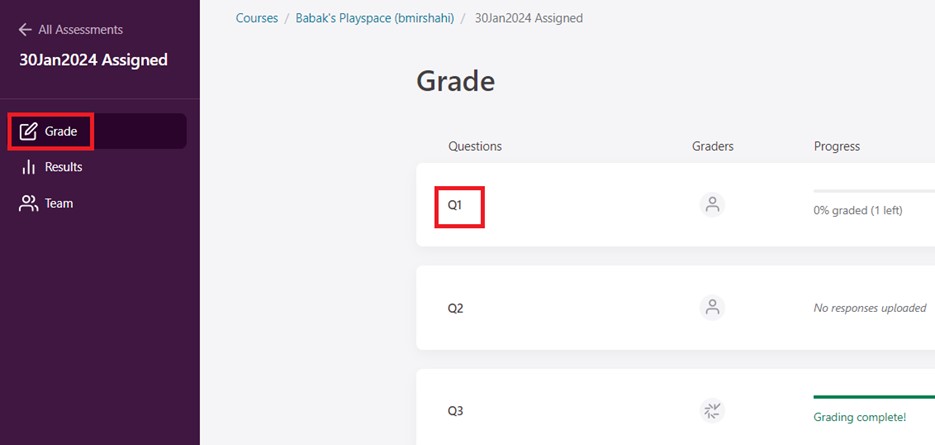
Step 3: Use Grading tools to leave comment and feedback
Use Grading tools to leave comments and feedback when grading. The available tools will depend on the type of question response. The available tools are as follows:
- To grade image/PDF file responses: Comment field, Drawing, Stamp, Highlighter, Delete, Color Palette and Comment Library.
- To grade text responses: Highlight with comment, Highlighter, Strikethrough, Delete, Color Palette and Comment Library.
Comment Library opens a list of frequently used comments. You can use the comments by dragging and dropping them to the page (or selected text). You can assign a positive or negative point associated to every comment. To learn more, see Using the comment library.
Points
A point value can be attached to a comment, which will be automatically reflected in the question score when it is placed on the page. You will see an “(auto)” indicator under the score in the grading sidebar. Positive or negative points can be attached to comments.
Adding a comment with a positive point value will add that number from a starting score of 0.
Keep in mind that if you use comments with both positive and negative scoring in the same evaluation, the order in which you place the comments matters. For example, if you use a comment with a positive point value first, then use a comment with a negative point value, the negative point will be subtracted from the positive (current) point value.
Using the grading keypad or your keyboard to manually add a score to the question will override all comment points in the question score. If you remove your manual score by clicking the “x”, the question score will revert to the automatic “(auto)” score set by the comment points.
How to assign TAs to grade Crowdmark Assignments ?
When in a Crowdmark course, under the “Course team” tab in the dashboard, you have the option to either add the graders by entering their emails or via syncing with Brightspace.
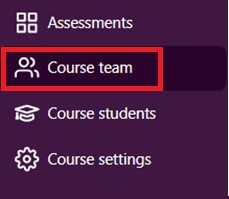

If you select Sync with Brightspace, it will suggest adding TAs and Instructors of your class list as your team. You have the option to add all or a few of them at your will.
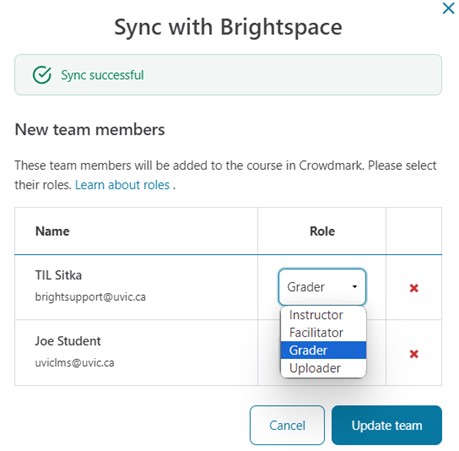
Your team members will be added to the course and will each receive an invitation email. For more details, visit “Importing team members from Brightspace.”
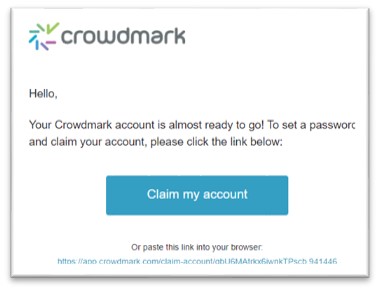
The selected TAs will receive an email notification. If they do not have a Crowdmark account yet, they will need to create one first by claiming their account and setting up their name and password.


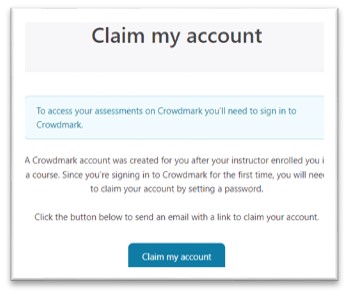
For more information on Team roles, visit “What is the difference between roles.“
After adding assignments to the Crowdmark course, you can customize graders’ access to every single assignment/ exam under “Team” dashboard. Once students have attempted the assessment, you may trigger a notification to the graders again by hitting “Send notification emails”. For more information visit, “Managing team members.”

FAQ: Can Crowdmark assign graders to mark specific questions within an assessment?
While Crowdmark cannot assign graders to specific questions within an assignment (exam), graders can grade specific questions (e.g., all Q1s in an assessment) if asked to do so by the Instructor. Please note that there are no restrictions within Crowdmark that would prevent a Grader from grading other questions within an assignment if they chose to do so.
Step 4: Enter marks and move to question
Enter the marks > Ok > Next ungraded Q1.

Note: If your course has more than one student and the assessment has more than one question, Crowdmark allows you to grade Q1 for all the students. Once you have completed Q1 for Student 1, you can move to Q1 for Student 2 by clicking on Next ungraded Q1.
Extra info: Keyboard Shortcuts for Grading
Using keyboard shortcuts can make grading more efficient. Click the Shortcuts link in the top right of the screen to see the list of shortcuts.
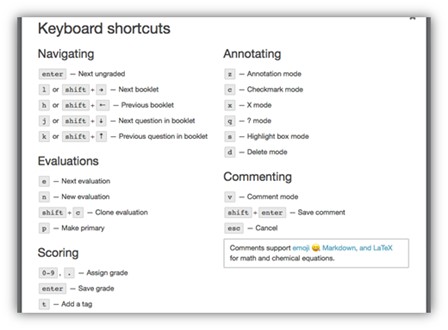
Visit these resources for more information on Crowdmark grading:
Returning grades to students
In Crowdmark, feedback and mark up on assessments are not immediately made available to students. Once all the assessments have been marked and you are satisfied with the grades and feedback on the assessments, the grades can be returned to students by following the steps below:
How to make Crowdmark grades available to students
The instructor can include an Assessment summary message with/without an attachment to go to all students.
Step 1: Navigate to your assessment and click Results in the sidebar.
Step 2: Click the Return grades button.

This will send an email to each student containing a link to their score page, which includes their work, overall scores, feedback, and any other information you’ve chosen to include. For more details, please see here.
How to export Crowdmark results into Brightspace gradebook
Instructors can export the results from Crowdmark assessments to Brightspace gradebooks. Please follow the instructions of this guide for more details.
- From your assessment Dashboard, click Results in the sidebar.
- Click the Sync grades (Sync grades with Brightspace).

- This creates a grade item in Brightspace with the same name as your assessment and puts it under a grade category, namely Crowdmark. It simultaneously exports the student grades from Crowdmark into this grade item.
- You can edit the grade category or grade item to reflect your course’s grading scheme.
How do students receive feedback on their assignments in Crowdmark

By clicking on the Assignment title, students can see the feedback details for every question.


