This article explains how Echo360 can be used to create interactive powerpoint presentations and videos, including polls, discussions, confusion flags, notes and more
Presentations, discussions, polls and interactive media allow instructors to promote learner participation, while also allowing learners to ask or answer questions, and flag points of confusion in real-time or asynchronously. Activities can be created before classes and linked to the appropriate slides. Once this is done, learners viewing content will be able to answer questions, respond to polls and engage with interactive media.
Create and edit presentations
Instructors can upload presentations and then edit them by adding, re-ordering and removing different types of slides. Instructors can also create classes and add presentations to Echo360 classes.
How to upload and edit a presentation
Upload and edit a presentation in Echo360 following these steps:
- Create a presentation or PDF file in an external program such as Powerpoint, Pages, or Adobe Acrobat, or other similar program. As long as the completed file is in one of the accepted content formats.
- Upload your file to your Echo360 Library.
- Add additional slides to the presentation (optional):

How to add a presentation to a class
The two most common methods for adding presentations to classes are:
-
- Upload – select a presentation file (PPT or PDF) from your computer or cloud storage, publish it immediately to the class
(It becomes available for viewing AFTER it is processed, so there may be a delay, depending on the size of the presentation) - Import – select a presentation that has already been uploaded to your Library
- Upload – select a presentation file (PPT or PDF) from your computer or cloud storage, publish it immediately to the class
NOTE: Each Echo360 “class” can contain ONE presentation and ONE video. If you need to provide multiple presentations for a particular class, create a new class to hold the media. If necessary, you can then create a new collection and group related classes together in the collection.
To add a presentation to a class, follow these steps:
- Navigate to the class list for a section, either by clicking a Course tile from the Courses tab or via a link in your LMS. This opens the class list, as shown below.
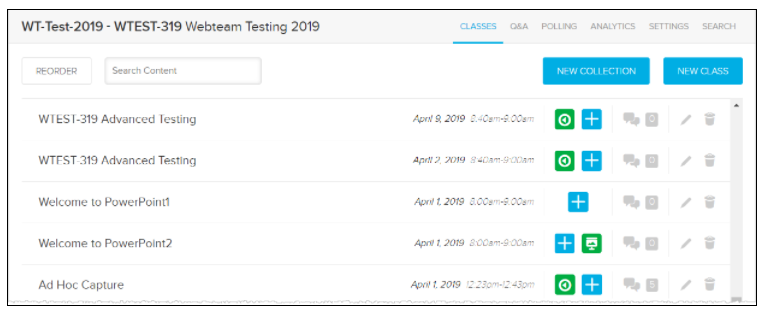
- If the class does not yet include a presentation, click the plus icon as shown in the below figure.
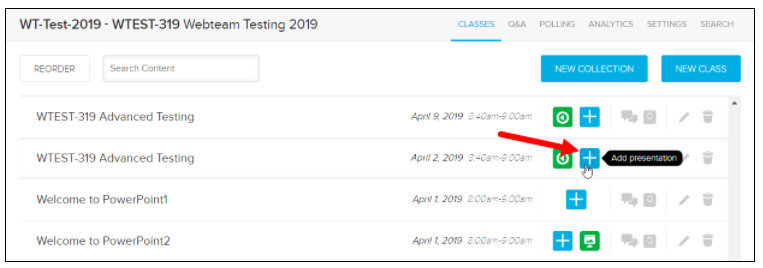
- If the class contains no content yet, select Add presentation from the menu that appears for the plus sign.
- In the dialog box that appears, you have the options as listed at the top of this page; Upload and Import are described below.
-
- Select Upload a file, then select an existing presentation file from your local computer or cloud storage location in the Filepicker dialog box. File location options are listed on the left. The file is uploaded and processed and will be made available for viewing once processing is complete.
- Select Import from your library, then search for and select the presentation file already uploaded to your content library to publish to this class.
-
If the presentation was uploaded, it must be processed before it can be viewed. The icon turns green when it is ready for viewing.
Click the presentation icon in the class list to access options for the presentation, such as:
-
- Edit an uploaded presentation to add activity or media slides (click Edit presentation)
- Make the presentation unavailable or to set availability on a schedule for students (click Make unavailable or Availability settings)
- Rename the presentation if the uploaded presentation still has the filename instead of a more descriptive title (click Edit description)
Troubleshooting: If you use a plug-in (such as ChemDraw) to generate equations, molecular drawings, or other items for your PowerPoint presentation, you may find these being stripped or otherwise altered when you upload the file. In this case, convert the PPT to PDF and upload the PDF.
Engage learners with discussions and Q&A
Instructors and learners may post questions and responses within presentations and interactive media before, during or after a class. Since Brightspace also has a discussion tool, we recommend that instructors provide clear instructions to learners about where to look for discussions, and what expectations there are for posting / contributing.
Real-time (in-person or online)
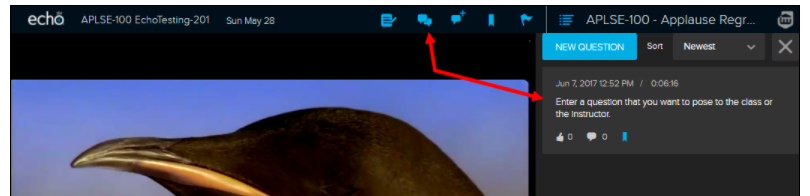
The Q&A tool allows instructors to ask and answer text-based questions during real-time sessions. Discussions are indexed to the presentation slide where they occurred, and discussions are saved so that learners can review them after the session (e.g. someone who was sick, someone who wants to continue to participate after the class, someone who wants to review Q&A as a helpful study aid before an exam).
Instructors can facilitate discussions during live sessions by following these steps:
- Create a Class in an Echo360 Course
- Add a presentation
- Add some activities (optional)
- In the live class, ask learners to navigate to their Brightspace course and then open the Class within Echo360
- Instructors and learners can use the Q&A tool to ask and answer questions during the class
- That’s all there is to it!
Learners can also ask and answer questions, or add comments, during a session. The text-based approach of the Q&A tool provides flexibility for how learners choose to participate, or are able to participate (e.g. if they are hesitant to verbalize questions in class, or if they have a sore throat, or if they have a disability).
The Q&A tool allows learners to post anonymously (anonymous to peers, instructor can see who posted). In addition to Q&A, learners can create personalized and private notes, bookmarks, and confusion flags, and answer polling activities that you have chosen to include.
Asynchronous (in-person and online)
Asynchronous discussions offer instructors and learners flexibility for when / how to communicate and share ideas, provide feedback, ask questions before a class, or reflect on and revisit discussions after class.
Instructors can pre-populate an Echo360 class with questions so learners can see and engage with questions outside of class time.
If content is present (e.g. a presentation) then the questions and responses can be indexed to content and activity slides. If there is no content present (empty class) instructors can still add questions, and these questions and responses will exist independently, not associated with any content.
The anonymity feature of the Q&A tool allows learners who are less confident to participate in discussions without revealing their identity to peers. Instructors can always see the name of who posts.
Instructors can create a Class and pre-populate it with questions by following these steps:
- Navigate to a Brightspace course and then select Echo360 Library from under Course Tools.
- Select a Echo360 course from under the Courses tab.
- Click to create a New Class and name the class.
- Click Create.
- Click anywhere on the new Class row to open the empty Class.
- From within the Class window, add discussion topics by clicking on the chat bubble icon and then New Question (or single bubble +), located at the top of the screen.
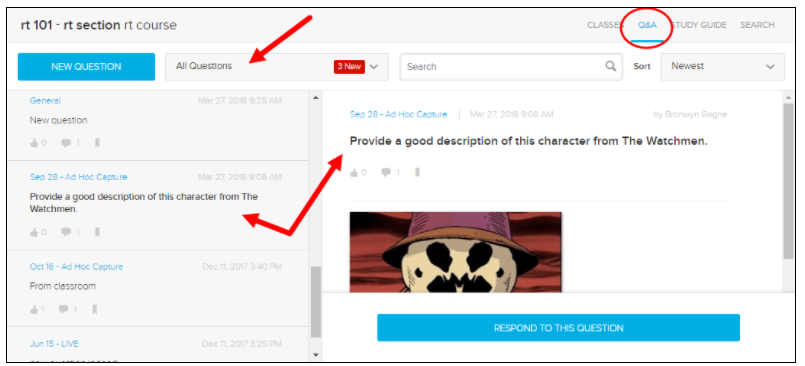
How to access and use the Q&A tab
The Q&A tab is a bit like a one-stop-location for reviewing course discussion posts and responses, and allows instructors to:
- see all questions and responses for a specific class
- endorse student posts and responses
- delete a question or response (deleting a question also deletes associated responses)
Engage learners with polling activities
Polls can be used to help learners assess their own knowledge, gather information from learners such as course feedback, and other questions. These can be attached to the gradebook if desired.
Real-time (in-person or online)
Whether you are delivering a real-time session in-person or online session, you can screen share your presentation the way you typically would and facilitate polling as you go. Polling can help to break up a session, check understanding, provide an icebreaker, and get feedback on how the session is going.
We recommend preparing your presentation and polling activities in advance, and then adding your presentation to your Echo360 class.
Learners can log into their devices (browser or mobile app) and follow along with your slides and then interact with / answer polls as you deliver them. Many learners are new to Echo360 so we recommend using some low stakes warm-up questions to allow you and your learners the opportunity to practice. This resource for learners can help them familiarize themselves with the different types of polling questions and how to respond to each type.
In your real time in-person or online class you can close or reset the poll activity, show learners their responses to polling questions, and show the correct answer (if there is one).
The buttons you have for your polling slides include the following (from left to right):
- Total number of submissions/total number of students in the course. This isn’t a “button” but a panel that gives you information on how many students in the course have responded to this poll.
- The Hand Icon – this button CLOSES the poll to additional responses. You can close and then re-open the poll if necessary, or close it and leave it closed. Students will see a Poll Closed button on their view of the polling slide. You must close the poll in order to show the correct answer (see Checkmark Icon below).
- The Bar-graph Icon – this is the “show results” button and exposes the responses that have been submitted to this point. NOTE that if a user has not yet responded to the poll, they will NOT see the exposed responses until they do.
- The Checkmark Icon – this is the “show correct answer” button and exposes the correct answer (if one is identified) to all users. This button is disabled until the poll is CLOSED (click the Hand icon to close the poll). This is so that students cannot submit a response after seeing the correct answer (unless the instructor re-opens the poll). This button is grayed out in the below figure because the poll is still open.
- Reset poll – this button refreshes the polling question and REMOVES all current responses. This allows (and requires) students to respond again.
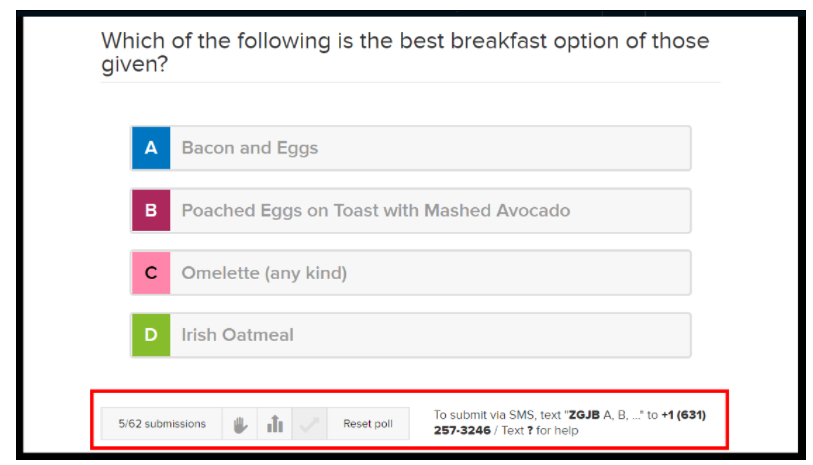
Students can also respond to polls using SMS (text), as long as they are registered for the class and have provided their mobile number in their account profile (so the system can recognize the responder).
The phone number and activity code (GHSF 42 in the above figure) for SMS responses are automatically provided on the slide.
Asynchronous (in-person or online)
Presentation files and interactive activities (discussions and polls) can be shared with learners in advance of a live session or instead of a live session. This allows instructors to create active learning opportunities that students can engage with asynchronously.
Some examples:
- a pre-lab recording or slide deck with poll questions so learners can self-assess their knowledge
- prompter / seeded discussion questions that learners are asked to respond to before a live session
- a standalone mini-lecture with content and polling questions
Instructors have the option of engaging with discussions directly in the interactive presentation, addressing learner responses in a live session later, or using analytics tools to see where learners are confused.
Create, add or import polling activities
Polling activities can be added to presentations, or to video or audio media. Polls are re-usable items. You can create new polls, import existing ones, create and edit copies, and even share polls with other users.
How to create a new poll for your presentation
To create a new poll slide within your presentation, follow these steps:
- Find the presentation in your Library and select Edit Media.
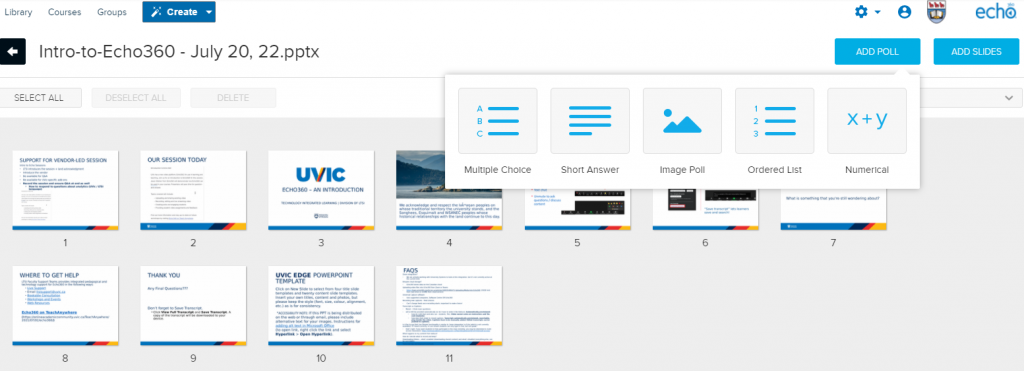
Alternately, select Edit Presentation from the media icon in the class list. - From the presentation editing page, click Add Poll.
- Select the type of poll question that you want to create.
- There are five types of polling questions to choose from: Multiple choice, Short answer, Image poll, Ordered list, and Numerical.
- Character Limitations: Polling Questions are limited to a maximum of 1000 characters. Student justifications currently have no character limit. Short answer responses are capped at 60k (60000) characters.
How to import a poll into your presentation
To import an existing poll slide from your Echo360 library, follow these steps:
- Find the presentation in your Library and select Edit Media.
Alternately, select Edit Presentation from the media icon in the class list. - From the presentation editing page, click Add Slides
- Select Import from Library from the Add Slides options, as shown in the below figure.
- The library content selection window appears, listing all of the presentations AND polls in your library, in alphabetical order by name, as shown in the below figure. Poll names are the question text in the poll.
- Use the Search text box to filter the list by Name/Question text, based on the text you enter.
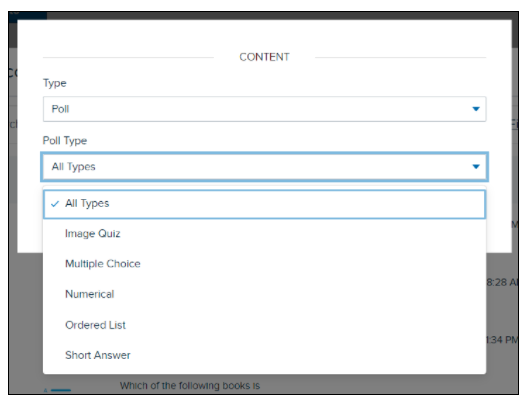
- Click Filters located to the right of the Search box to filter the list for only Polls.
- You are given the option to filter further by Poll Type, as shown in the below figure.
- Select the Library item you want to use from the content list, then click Import.
The poll is added to the presentation (to the right of the currently selected slide). Repeat these steps to add another Poll from your library into this presentation.
Click on any of the slides from the lower panel to activate the options buttons.
Select Move Selected to Presentation to add the selected slide to the presentation open for editing. Hold the Ctrl/Command key to select multiple slides at once.
When finished, click the X located to the right of the Imported Slides bar to close the view of the imported presentation slides.
How to create or copy a poll and embed it into your media
When you first embed a poll into a video or audio file, you create a new piece of media called “interactive media”. This is now a separate piece of media from the original video/audio file. For this reason, we recommend editing your media before you add polls (you will not be able to edit the media after).
To create and embed a new poll, follow these steps:
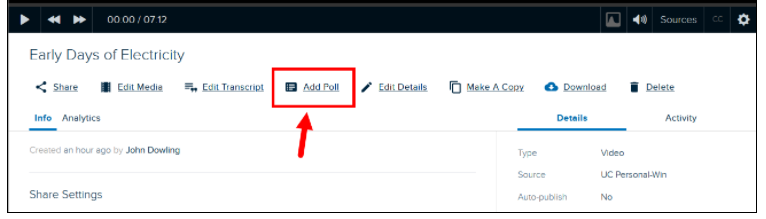
- Find a video or interactive media you want to create a new poll for.
- For a video, select Add a Poll. The below figure shows this command in the media details page, but this command is also available from the menu button on the media tile in the library.
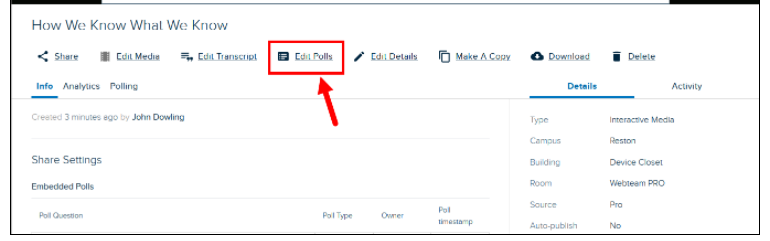
- For interactive media, select Edit Polls. The below figure shows this command in the media details page, but this command is also available from the menu button on the media tile in the library.
- In the screen that appears, select Create A Poll.
- Select the type of poll you want to create. Your options include:
- Complete the poll fields as provided, depending on the type you chose. Be SURE to include a timestamp where you want the polling question based on this new poll to be placed. You can edit this later as needed.
- If desired, enter response feedback for students after they respond. The feedback can be for correct and/or incorrect answers, or more generalized feedback for the poll as a whole.
This feedback is shown to students AFTER they respond to an interactive media poll, or after the poll is closed for further responses in a presentation.
- Click Done.
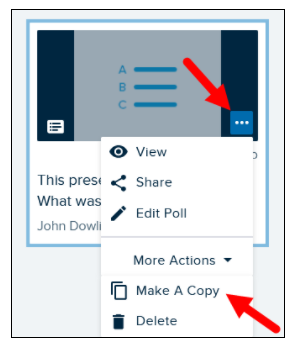
To create a copy of a poll, follow these steps:
- Find the poll you want a copy of.
- Select Make A Copy from the media tile icon.
- Alternately, you can click ON the poll and select Make a Copy from the media details page.
The copy of the poll appears in your Library with your name shown as the owner. If this is a copy of a shared poll, you can now remove the original from your library if you want to.
How to embed an existing poll into your media
When you embed a poll into a video or audio file, the result is a new piece of media called “interactive media”. This interative media is a new file and separate from your original video or audio file.
Once you add a poll to a video, you have a piece of interactive media. You can edit interactive media to add MORE polls, or change the locations, or remove the polls that are there (but cannot edit the video or audio). For this reason, we recommend editing your video or audio before you embed polls.
To embed a poll into a video/audio file
- Find the video you want to embed polls into and click on the tile to open the media details page.
- Select Add A Poll from the commands available. This is shown in the below figure.
- Alternately, you can select Add A Poll from the tile menu in the Library for the video
- In the Interactive Media editor that appears, click Play or use your arrow keys to move through the video, or drag and drop the playhead to the location you want to place the first polling question.
The playhead does NOT have to be in the exact location; you can edit the time stamp once the poll is added. But getting close is helpful - Click Pause if necessary to pause playback.
- Scroll down to the bottom section of the page.
- In the Library Polls tab, use the FIlters and Search box to find an existing library poll you want to add to this video. You can edit the poll after you add it to the video.
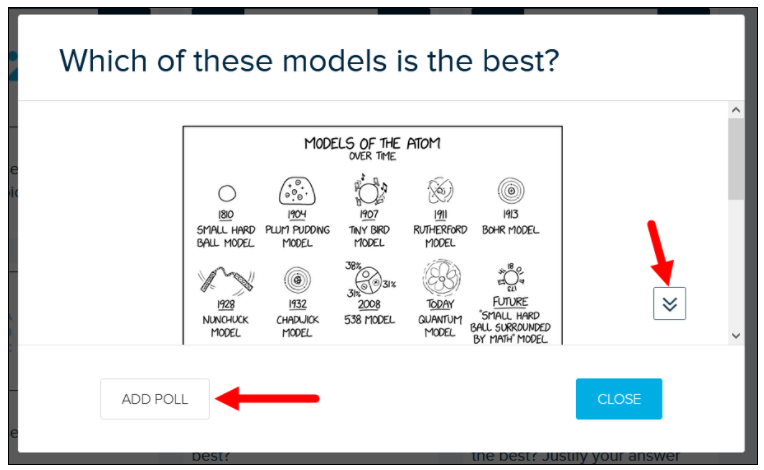
- Click the poll you want to embed. The poll opens in a pop-up window,
- Use the scroll-bar on the right or the arrows button, identified in the below figure, to see the lower section of the polling question if necessary.
- If this is the poll you want to add to the video, select ADD POLL, also identified in the below figure.
- When the interactive media editor appears, with the poll is showing in the viewer, the poll location identified on the playback bar. The bottom section of the page shows the Library Polls tab, allowing you to add another poll as needed.
- Click Play again and use your arrow keys or drag the playhead to a new location, and repeat the above steps to embed another poll.
- NOTE: You cannot place two questions at the same location; they must be offset by at least one second. If you attempt to add another poll without moving the playhead first, you will get an error.
- To make CHANGES to the polls once they have been added, click the Embedded Polls tab at the bottom, to show a list of all the polls resident in this media.
- Select the polling question you want to change. Notice that the options on the tab change to provide editing capabilities. See also Editing Polling Questions in Interactive Media.
- Click the pencil icon to edit the details of the question or responses. Remember that changing the polling question after it is embedded does NOT change the original poll used to add it.
- Use the Timestamp box or the arrows to the right and left of it to change the positioning of the question in the video.
- Click the trash can icon to remove this polling question from the video.
- When you are finished adding polling questions to the video, click Save.
- Click Library from the top menu to return to your library.
Once created, you can edit your interactive media. Editing interactive media involves adding, editing, and removing the polls inserted into the video/audio media.
Additional features for learner engagement
Confusion flags
When learners follow along in Echo360 presentations (either in-person or asychronously in an online video) they can anonymously flag slides and material that they finding confusing or that they would like the instructor to explain further.
When a learner flags content then a notification is sent to the instructor. The notification flag includes the location within the presentation or video where the content was flagged.
Instructors can review confusion flags during class to gain immediate feedback on their teaching and address confusion immediately, or they can review confusion flags after class and provide clarification asynchronously (e.g. Brightspace Announcement, a short Echo360 recording).
Instructors can also view a full list (summary) of links to class content locations that learners found confusing by reviewing their Confusing content list in their course analytics.
Note-taking and study guides
Learners can create contextualized notes and bookmarks throughout their class, or in advance if presentations are available before class. These notes and bookmarks are private to each learner, searchable, and allow learners to maintain their own study guide.
What to tell students and how to support them
Echo360 will be a new video-platform and learning environment for most UVic students. The content below provides some tips and resources that are designed to help students familiarize themselves with Echo360, learn how they can personalize their learning experience, and access the Echo360 mobile application.
Additional Support
What's next?
Take your learning to the next level with an Echo360 workshop.
