The New Content Experience (NCE) is a course layout that is designed to be more user-friendly way to navigate Brightspace content. Switch to the NCE by following the instructions here. Because the NCE is “new” not all advanced features are available yet. However, if you’re looking for a simple course site, this may be for you!
What is the New Content Experience?
Modules and submodules have been redesigned as units, lessons, and folders to help conceptualize organization. The user interface is streamlined to make it easier to create and edit material as well as to navigate to content and activities.
- Read more about why Brightspace developed the New Content Experience (log-in to D2L required)
- Learn more and access a list of tutorials specifically for the New Content Experience
- Consider also using our pre-loaded Course Template to help organize your content for your students
When to use the Classic or New Content Experience?
Use Classic Content Experience if you…
- use release dates for content (versus manually hiding and unhiding them)
- use activity tracking extensively
- want future activities to display in the content area (without making a quicklink)
- rely on the bulk editing feature to update multiple items quickly and need more than 3 layers of submodules
Consider New Content Experience if you..
- want a more streamlined content area
- want better navigation from the Table of Contents sidebar
- want a simpler and more visual menu experience for creating new content or adding existing content
- find the updated naming conventions of organizational elements (Units, Lessons, Folders) more clear
- want simple rather than bells and whistles
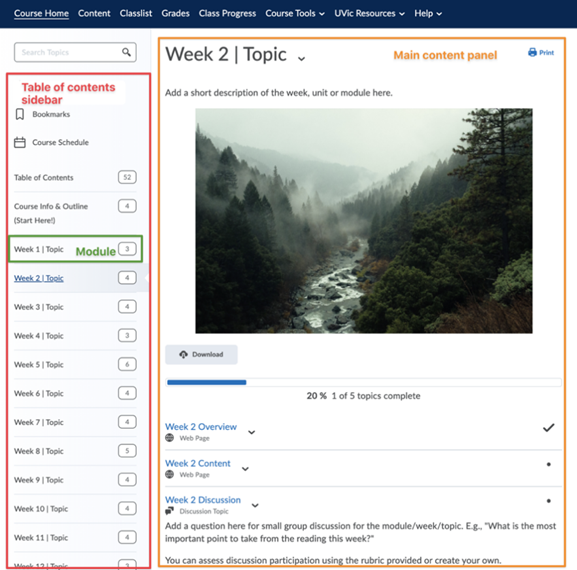
Classic Content Experience

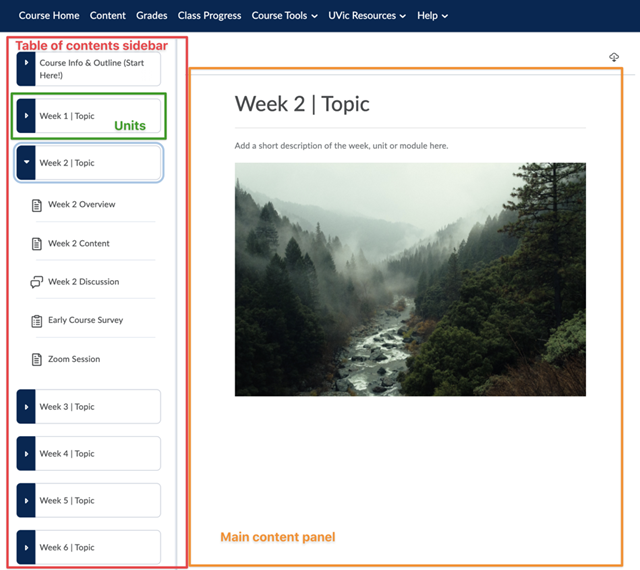
New Content Experience

How do the two experiences differ?
Learn more about differences in our 9-minute video: “Comparing the New Content Experience to the Classic Content Experiences”. Or, check a summary of the main differences in the section below.
Navigating to Content
Classic Content Experience
- The Table of Contents sidebar is not always displayed. Clicking on a menu item from the Table of Contents sidebar opens the item in a new webpage which does not automatically display the sidebar. Further navigation can then occur inside the pages by clicking on the left and right arrows in the top right corner of the main content panel.
- The Table of Contents sidebar does not expand to display all content pages and activities within a unit; these are displayed within the main content panel to the right of the sidebar.
New Content Experience
- The Table of Contents sidebar is always displayed. Clicking on a menu item from the Table of Contents sidebar opens the item within the main content panel on the same webpage, maintaining the display of the Table of Contents sidebar. Most navigation is done with the sidebar.
- The Table of Contents sidebar expands to display all content pages and activities within the unit.
Creating an Organizing Structure
Classic Content Experience
Two possible levels of organization: Modules and Submodules. Modules can contain submodules; submodules can also be nested within each other.
Note: it is recommended that you only use Submodules when absolutely required. Navigation is easier for students if items are contained at the Module level, unless there are many items.
New Content Experience
Three possible levels of organization: Units, Lessons and Folders. Units can contain several Lessons, and Lesson can contain several Folders.
Note: it is recommended that you only use Lessons and Folders when absolutely required. Navigation is easier for students if items are contained at the Unit level, unless there are many items.
New Button(s) for Adding Content
Classic Content Experience
‘Upload/Create’ and ‘Existing Activities’ buttons expand a drop-down menu with the available options.
- Create a new webpage to add your own content by clicking ‘Upload/Create’ and selecting ‘Create a File’.
- Add files from your computer by clicking ‘Upload/Create’ and then ‘Upload File’ to select it from a folder on your computer. To select from course files, use this same process.
New Content Experience
‘Add Existing’ and ‘Create New’ buttons at the top of the main content panel open up screens with the available options displayed clearly with icons.
- Create a new webpage to add your own content by clicking ‘Create New’ and selecting ‘Page’.
- Add files from your computer by clicking ‘Add Existing’ and in the box underneath the menu options and icons, either drag & drop your file or click ‘Browse’ to select it from a folder on your computer.
- To select from course files, click ‘Add Existing’ and click ‘More’ to reveal additional menu options including ‘Course File’.
New Button Location for Editing or Deleting Content
Classic Content Experience
- The down arrow next to the title of each module or content page provides the menu to delete the item or enable editing.
- Bulk editing can be enabled as a quicker way to edit multiple dates, information or visibility of content within a module. Click the ‘Bulk Edit’ button within the main content panel above the module items to enable this feature.
New Content Experience
- The ellipsis in the top right corner of each unit or content page provides the menu to delete the item or enable editing.
- Bulk editing is not an option within the New Content Experience. Items must be edited individually.
Activities Open in New Tab
Classic Content Experience
Activities open in the main content panel when you click on an activity located inside a module. Instructions for an activity are visible in the module
New Content Experience
Activities open in a new tab within their designated area (e.g., the Assignments area). Activity instructions and due dates are not visible in the main content panel – must go to the activity directly to see this. While this involves an extra click, it can also avoid your content view from being cluttered by long activity instructions / descriptions.
Content Scheduling and Visibility
Classic Content Experience
Start and end dates can be added to any type of content (modules, HTML documents, activities such as assignments or quizzes, etc.) from the main content panel. These can also be hidden or made visible through the drop-down menu next to each item in the main content panel.
- If an activity has a start date in the future, instructors can still add it to the Content area so that the details are visible but the activity itself is inaccessible.
New Content Experience
Units, lessons, folders, HTML documents, external links and files can each be hidden or made visible by toggling the switch at the top left of the main content panel. Scheduled start and end dates are not an option for these types of content however.
Unlike the items above, activities (such as assignments or quizzes) can have availability windows. These can also be hidden or made visible in their designated area, accessed from the Course Tools menu.
Restricted Activities
Classic Content Experience
Activities that are scheduled to become available in the future can be displayed in the content view.
New Content Experience
Activities that have a start date in the future are hidden in the content view until available. To create a placeholder, you can add a page and include a quicklink to the activity. To make this easy as possible:
- Go to “Create New”.
- Add a new Page.
- Choose “05_Activity_Quicklink” from the drop down template menu next to the title field.
This will allow you to display information about a future activity directly within the topic before it comes available.
Note that if the start date for your activity is in the future and you try to add it to the Content area as an activity (not using the method described above), toggling the ‘Hidden’ switch to make it visible from the main content panel will prompt you to clear the restriction dates.
Visual Tracking & Bookmarks
Classic Content Experience
- Students will see visual tracking (checkmarks) for items visited in the content modules.
- Students are able to bookmark content pages or activities.
- Opening an HTML document or file from the main content panel within a module will open it in a full-page view. In the top right corner of this screen, there is an icon of four arrows ‘expanding’ which you can click to view the content in a larger, full-screen view. Scrolling down to the end of the HTML document title will reveal ‘Download’ and ‘Print’ buttons.
New Content Experience
- Students will not see visual tracking (checkmarks) for items visited in the content modules.
- Students will not be able to bookmark content pages or activities.
- Opening an HTML document or file from the Table of Content sidebar opens it in the main content panel. In the top right corner of this panel, there is an icon of four arrows ‘expanding’ which you can click to view the content in a larger, full-screen view. Clicking the ellipsis next to that icon will provide additional options such as opening it in a new tab or downloading the item. Once an item is downloaded, it can be printed from the user’s computer.
Interested in adding the New Course Experience to your course? You can switch between content experiences yourself by following these steps. If you have any question about this or need assistance with the change, please let us know by sending an email to ltsisupport@uvic.ca.

